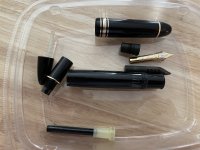
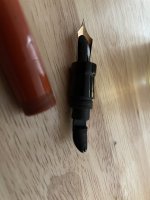
I can be too much of a tinkerer for my own good, and I've really gotten in to Parker Vacumatics lately. They also are deserving of a write-up.
In any case, though, Vacumatics are frequently found non-working thanks to the diaphragm, a $5 part, wearing out. This is a piece of latex rubber with a rather...interesting...shape
To give a bit of history on the Vacumatic:
The first self pilling(pens with a mechanism that would draw ink into them, rather than having to load ink with an "eyedropper" or other tool) used a latex rubber sac inside the barrel. The sac was/is attached directly to the back of the pen's feed(see my Parker Duofold photos up a bit). Some mechanism is used to activate a metal bar, called the pressure bar, which "squeezes" the air out of the sac, and then releases it. The resulting vacuum draws ink into the pen assuming the nib/section are in a fill bottle. There are numerous ways the pressure bar is activated. The first was simply a metal disk sticking out the side of the pen. A somewhat more elegant solution was the lever, which is pulled down from the side of the pen and then pressed back in to the body. Parker and a lot of European makers preferred button fillers, where a button at the end of the barrel activates the pressure bar-I consider this the most elegant solution.
The sac has problems, though. For one, the ink capacity is limited, and in addition it's difficult to see how much ink is actually present. The sac is also prone to failure, causing ink to leak out of the pen and make a mess.
A couple of things happened in the 1930s that made Parker rethink the idea of the self-filling pen. Celluloid had already proven itself as a reliable and durable material, and it was possible to make it "clear". If ink were placed directly in the barrel, the ink level could be viewed through transparent "stripes" in the celluloid body.
So, the smart guys at Parker got together and developed a new filling mechanism that would allow ink to sit inside the barrel.
Away went the rubber sac and pressure bar. Instead, a sort of "pump" was developed that fit at the end of the barrel. Basically, it would use a latex diaphragm(as pictured above) attached to the end of a "plunger". This completely sealed the end of the barrel. As the plunger was pumped, air would be expelled out of the barrel, and as it was released a vacuum would be created in the barrel that would draw ink in. To make this work efficiently, and also equalize pressure inside and outside the barrel, a breather tube was fitted to the feed-basically when pumping the plunger down, air would take the path of least resistance out of the breather tube, and then ink sucked back through it. ~10 pumps or so would flll the pen completely.
The Vacumatic mechanism worked well enough that the first ~8 years of Parker 51 production used it.
The celluloid construction gave some very beautiful designs, and I need to photograph some of mine for this thread. With that said, the rubber diaphragm, after 70+ years, often is nothing but a petrified mass of rubber.
Replacing it is considered a sort of "next level" pen repair(beyond replacing sacs, etc). One of the reasons for that is it needs a variety of special tools. I've recently purchased a full set of them. Here they are
The cased part is called a "Vacumatic Wrench" and it's sort of the starting point for all of this. A vac wrench is needed to to remove the filling unit fro the pen, the start of all of these repairs.
Once the filling unit is removed, the diaphragm often remains stuck to the barrel, and that's where the two tools to the immediate right come into play. They are used to help extract the remains of the diaphragm from the barrel. The one with the two knurled nuts includes a reamer that's used to scrape all the residue of the old diaphragm out(I've been fighting with one this evening that's taking me a while to get).
Once the filling unit is out of the barrel, the old diaphragm has to be removed from the plunger. It has a small hard rubber ball in the tip which fits into a "socket" on the end of the plunger. There are a few ways to extract this, but the company Pen Tooling, which sold a lot of these tools, sells a special reamer designed to partially break up the pellet. The two dental pick tools are then used to pry it the rest of the way out.
The new diaphragm, after being trimmed to length, then needs to be installed. The "pellet" is pushed back into its socket using, what else, another special tool called the "pellet pusher"(orange sleeve above).
Virtually all sac repairs, and the inside of the vac is no exception, need a dry lubricant. As it turns out, 100% talc is the best tool for this, and that's what's in the plastic bad to the top right.
Finally, and this was a bit of an interesting step to me on vac repairs. The Parker repair main described, on reinstalation of the filling unit, that the outside should be coated lightly with "Vacumatic Lubricant". This so-called lubricant was a latex rubber safe water based, water soluble lubricant. Of course, this is long gone, but such products are in fact readily available from non speciality suppliers. As it so happened, I had a bottle of perfectly appropriate "vacumatic lubricant"-a latex safe, very slippery, water based and water soluble lubricant-in the night stand. I'll leave that one there.
I'm nearing completion on my first repair, and hope I can report on it soon.


