Any Unreal Engine Experts Here?

Dude, you're killing me! We used to have conversations! We used to be FRIENDS!

But anyway, HORRIBLE SLIGHT aside, if you want to hit the ground running as soon as possible, I'd watch this quick 7 minute video showing off the tools you'll be most using while modelling. I'd replace Grid Fill with the Inset tool, but, eh, it's still pretty good.


But if you want to get a little more indepth with the basics, Grant Abbitt's series is solid for that.


Okay, I just realized I misread your quote.

Yes, I'm Renzatic over at Blenderartists too.

Yes, Friend remain calm. :D I know you were at MRs, you came here from MRs, we were friends there, had many conversations, and that you were banned, but what I did not know or forgot is that you were basically permanently banned there. That is what the sorry was about. I groveled to what’s his face and he reinstated me. 👀

Thanks for the links!

Now regarding Blender, I got it downloaded and created a flat grid with it, but I want to duplicate that grid in the Forrest Video Tutorial. If there is a short list of steps to duplicate it, I’d appreciate it, things like snap to grid, or no snap which made most of the little points dissapear on me. I think I can pick multiple points and use the to pull up a section. But really the answer is for me to get into one of the Blender tutorials.

In the UE tutorial last night I was studying the pipeline and textures. Getting ready to jump into UE static mesh tips and functionality.

Note: My ability to connect with TalledAbout has been intermittent for over a week. Hence my replies here maybe delayed. I have visited blenderartists.org and will establish an account there. Are you Renzatic there? :)
 
Yup. I'm Renzatic EVERYWHERE.

Okay, let's start with the bare basics here. There are three tools you're going to be using most to create that road. First and foremost...

Loop Cuts - Ctrl+R (or whatever the Mac equivalent is. I think it's the cloverleaf). This will cut an edge into your vertices, sourced from the edge you hover the mouse cursor over. You can scroll the mousewheel up and down to increase or decrease the amount of cuts being made.

Grab/Translate tool - G. This will move your selected vertices, edges, or faces about. You can constrain movement to a specific axis by hitting X, Y, or Z.

Scale tool - S. Scales your selected vertices away from each other.

Vertex, edge, and face selection mode - 1, 2, & 3 respectively. If you want to grab the dots, hit 1. Want to grab a long edge? Hit 2. A whole polygon face? Hit 3.

Edge bevels - Ctrl + B. This will take one edge, and split into two or more. Increase or decrease the number of cuts on the bevel by scrolling your mousewheel up or down.

When you get right down to it, these are all you need to make your road. When you get right down to it, modelling is a lot like sculpting, only you're constrained to a wire case, and you're moving your elements around to around to define a shape. If you need more detail, you add more geometry, usually via loop cuts or bevels.

The best thing to do starting out isn't to try and make something, but to use your tools randomly to see how they behave. Once you have a good understanding of that, you'll be able to make that road easily enough. Just look at my picture above for reference, and see if you can figure out what I did.

If you need any help, don't hesitate to ask me.

Also, don't worry about snapping to the grid. You can activate it by hitting the little magnet icon at the top of the screen, but it's not really a concern for what you're doing.
I want to lay it out with the many points, called vertices? Grab the points for a center section and elevate them, drag them up. I just need to play with this or… read a tutorial lol.

In the UR Forest tutorial, the author took the center flat, but manipulated grid and butted a cube to it on one side, then removed the bottom and back side of the cube so there were only 2 sides of the cube remaining which connected to the center part and served to create the lip and horizontal section on the sides. The author just slam bams his way though it and continues on. While I will be stumbling my way through it. :)
 
While I will be stumbling my way through it.

Well yeah, that's because you're a totes noober, brah! :p

Okay, I watched the video, and the first couple of things he does is pops in a plane primative, scales it up, then runs some loop cuts through it along the Y axis (the green line in Blender). You can do the same by hitting Ctrl + R, and scrolling up a bit until you have 6 or 8 edges in there.

One thing he does do that I failed to mention above is that he uses proportional editing to get some smooth bumps in there. You can do the same thing in Blender by hitting the O key, then rolling your mouse up and down to change the area of influence.

He does the rest by adding a cube in, deleting all but two faces, then shaped the rest.

It's the shaping you'll want to spend the most attention on. Try to get some grooves and bumps on your flat road space, then move on once you feel like you're getting the basics of it.

Like I said, the best thing to do is just do it. See how everything acts and comes together. Do something random with the above if you so feel like it. It won't take you long to get a feel for it.

Oh yeah, one other thing I forgot. When you first lay down your plane in Blender, you're gonna be in Object Mode. It's more or less how Unreal acts, and where you'll position all your models and whatnot when you're laying out a scene. If you want to get to your vertices and all that good stuff, hit the Tab key to hop into Edit Mode.
 
Look at the Make A Forest in the Unreal Engine video link posted in this thread if you have not. I find this extremely impressive, however it is in UE vs Blender which you may not want to tackle. Even though most of this video is above my level, I can see how it is structured, how easy it is to place elements, and realize how important textures and lighting is to the finished process. There are things called “texture or material instances” sometimes called Master Material (or was it texture?) where variations in texture can be created. It look easy and complicated at the same time. ;) This is one of the things I’ll be learning Soon.

I did watch that video. The whole thing. It was cool. I think I did a similar one once on Unity. And it came out looking cool I think. Not as cool as the tutorial, but it was an interesting exercise. Nothing I think I could or would tackle on my own. It just doesn't interest me. If I was doing something that needed that level of graphics, I'd be looking for someone with those skills.

I've also watched enough Blender videos to know it's not for me. It's not the tool. I could learn to use the tool no problem. It's just that once I'm proficient with the tool, I don't have the art skills to do anything with the tool.

I'm not an artistic person. Never have been. I like fooling around in ProCreate, but the best I'll ever do is copy someone else's work. I accept that about myself. I'm creative at times, just not artistic. 🤷‍♂️

It's the same at work. I can't design the website. But I can take a design and get it on the page and make it do all the interesting things.
 
Last edited:
This was a super early experiment, I only have some static shots, I'll have to dig those up - it's Unity and I wrote an interface for the Facebook API that queried your photos and built a wall you could fly through. The concept was to build all these 3D constructs, like a "City of Content" from your various social media sources, maybe use meta-data/tags for some kind of geographical-like organization.
 
I'm not an artistic person. Never have been. I like fooling around in ProCreate, but the best I'll ever do is copy someone else's work.

The problem isn't that you're not artistic, it's that you haven't spent enough time goofing around, and cribbing from other people's work to say that you are.

Everyone starts out aping someone else. You find things you like, you copy it, you tweak it, and sooner or later, you'll eventually start developing your own style. The most important thing is that you stick with it.

Like with web design, I can guarantee you that the people who's work your copying themselves got their start copying bits and pieces from other people's templates, learning from the best. After awhile, they started getting a feel for what works and what doesn't, what they personally like, and what they don't, and now it seems like they're able to semi-magically create these awesome looking webpage layouts with no effort at all.

It's not raw, ingrained talent that's important. It's whether you like doing it, and have the drive to stick with it until you're good at it.
 
Well yeah, that's because you're a totes noober, brah! :p

Okay, I watched the video, and the first couple of things he does is pops in a plane primative, scales it up, then runs some loop cuts through it along the Y axis (the green line in Blender). You can do the same by hitting Ctrl + R, and scrolling up a bit until you have 6 or 8 edges in there.

One thing he does do that I failed to mention above is that he uses proportional editing to get some smooth bumps in there. You can do the same thing in Blender by hitting the O key, then rolling your mouse up and down to change the area of influence.

He does the rest by adding a cube in, deleting all but two faces, then shaped the rest.

It's the shaping you'll want to spend the most attention on. Try to get some grooves and bumps on your flat road space, then move on once you feel like you're getting the basics of it.

Like I said, the best thing to do is just do it. See how everything acts and comes together. Do something random with the above if you so feel like it. It won't take you long to get a feel for it.

Oh yeah, one other thing I forgot. When you first lay down your plane in Blender, you're gonna be in Object Mode. It's more or less how Unreal acts, and where you'll position all your models and whatnot when you're laying out a scene. If you want to get to your vertices and all that good stuff, hit the Tab key to hop into Edit Mode.
Thanks, I will play with Blender and report back!
Note I am not sitting at my computer all day long studying this stuff, but hitting it on more of a casual basis, some nights 2-4 hours. It is voluntarily eating into my game playing time Which is actually a good thing because it indicates a level of interest.

On the Intro into the UE Tutorial, I finally ran into some stuff that they hit on as if you are familiar with it.

  • Lightmaps- stuffing different graphical info in different channels (R,G,B) of a texture, definitely requires more study. I’m thinking this is along the lines of ”Master Materials”.
  • LightmapUVs- huh?
  • Material Types in Actors- multiple material types means an object must be rendered for each material type, so this should be minimized.
  • Overdraw- when a texture map excessively exceeds the size and shape object that you are applying the texture to, causes lots of extra work by the engine to render it,
  • DCC- that had me stumped for a while They just mentioned DCC then talked about 3D Studio Max so I searched and the acronym did not easily reveal itself. Digital Content Creation program.
  • Collision Meshes- what irked me was that the teacher, spent most of his time in 3D Studio Max (which I don’t have) showing you how ito make a Collision Mesh in it, then says oh UE will makes these for you automatically and sends a fraction of the time there. It was not hard to understand, but needs more study. So the object moving around in a scene needs a collision mess and all of the things in the scene it could bump into require Collusion meshes.
  • LOD- Level of detail models this was very cool but I’ll have to study it a bit more. I’ve noticed this in games and it’s cool. The farther you get away from an object the less details it shows, but not only because it is farther away, but because you should not make the engine display details that you can’t see, thst is not efficient and you want to reduce overhead. So the engine automatically loads, less resolution duplicate models with less polys to reduce the rendering work load. :)
  • When building an actor/object, being aware of the number of polys you are creating.
  • More to come! :)
 
Last edited:
I did watch that video. The whole thing. It was cool. I think I did a similar one once on Unity. And it came out looking cool I think. Not as cool as the tutorial, but it was an interesting exercise. Nothing I think I could or would tackle on my own. It just doesn't interest me. If I was doing something that needed that level of graphics, I'd be looking for someone with those skills.

I've also watched enough Blender videos to know it's not for me. It's not the tool. I could learn to use the tool no problem. It's just that once I'm proficient with the tool, I don't have the art skills to do anything with the tool.

I'm not an artistic person. Never have been. I like fooling around in ProCreate, but the best I'll ever do is copy someone else's work. I accept that about myself. I'm creative at times, just not artistic. 🤷‍♂️

It's the same at work. I can't design the website. But I can take a design and get it on the page and make it do all the interesting things.
Actually, I don’t feel that I am that artistic either despite having a BFA in Commercial Art and never working in the field. I‘m not that creative, tending to want to emulate things I have seen, but despite this there are some things, I can imagine, immersive scenes that I would like to create. So do what interests you whatever that is. (I’m sure you have already decided this.) I basically walked away from a career in commercial art 40 years ago, partially because I knew this about myself, but also wanted to be a pilot, and still like to dabble, hence my recent discovered interest in UE. And I’ve been exposed to a Grandson who wants to be a game designer. ;)

What struck me about the Design the Forest Tutorial was that even though many aspects of it were above my level, placing objects was rather simple. Bring them in and plop them down with an eye to distribution and emulating nature to some degree. The atmosphere the engine creates based on where you place some lighting seems to do the majority of work, as compared to hand painting a scene, yet one must understand what the capabilities and limits of the engine are which… I don’t really, not at this point.
 
Last edited:
I'm familiar with some of the terms above. A lot of them sound specific to UE, things I haven't had to deal with before, or go by a different name from what I'm used to (which happens quite a bit, actually). Here's the way I understand them...

Lightmaps- stuffing different graphical info in different channels (R,G,B) of a texture, definitely requires more study. I’m thinking this is along the lines of ”Master Materials”.

Lightmaps are simply the baked shadow and lighting information from your scene, usually performed on a per-object basis. Usually, this is handled by the engine itself, separate from your material stacks. Using RGB channels for a lightmap sounds like something you'd do if you're going for stylized lighting, not for a photorealistic scene.

What you're describing sounds more like channel packing to me, which is when you combine a number of images that make up a PBR material (normal, roughness, metallic, ambient occlusion, and height) into a single efficient image.

...I should watch the Intro to UE video myself to get a better idea of what you're talking about. :p

LightmapUVs- huh?

When you bake your lightmaps, the engine needs to know where to bake the light to on your object. That's where your Lightmap UV comes in, which is a 2nd UV channel on your model meant specifically to host lighting information.

Think of it kinda like layers in Photoshop, with UV 0 being your base color of your object, and UV 1, your lightmap, or the light colors, shadows, and whatnot painted on top of your base color.

And if you don't know what UVs are, well, that's a conversation in and of itself.

Material Types in Actors- multiple material types means an object must be rendered for each material type, so this should be minimized.

What they probably mean here is that you need to have one material per object for maximum efficiency. Like, for example, if you have some object that's a mix of wood and metal, like a pistol, you'd be tempted to assign a metal material to the metal bits of your pistol, and a wood material to the grip. That would work, but it'd be inefficient, especially when you start stacking tons of objects in your scenes. It's better to have both the metal and the wood in the same material.

Overdraw- when a texture map excessively exceeds the size and shape object that you are applying the texture to, causes lots of extra work by the engine to render it,

I think of overdraw as applying more to densely packed alpha mapped objects, like grass, tree leaves, particle effects, and whatnot. The engine has to calculate the alphas on each of these textures, what's in front of what, what's behind what, what can be seen through, what can't, and when they're all bunched together in a far more dense than it needs to be pile, the engine has to spend that much more time on it, hurting performance.

DCC- that had me stumped for a while They just mentioned DCC then talked about 3D Studio Max so I searched and the acronym did not easily reveal itself. Digital Content Creation program.

I could've told you that. :p

By the way, anything that can be done in Max, can also be done in Maya, or Blender, or Cinema4D, or what have you. They're all just polygon editors, doing basically the same things.

Collision Meshes- what irked me was that the teacher, spent most of his time in 3D Studio Max (which I don’t have) showing you how ito make a Collision Mesh in it, then says oh UE will makes these for you automatically and sends a fraction of the time there. It was not hard to understand, but needs more study. So the object moving around in a scene needs a collision mess and all of the things in the scene it could bump into require Collusion meshes.

Yeah, more often than not, you can let UE just make a collision mesh for you. Though if you want to maximize efficiency, you can make your own collision meshes in your favorite DCC.

Think of something like, say, a gas pump. If UE generates the collision mesh, it'll be based off the original mesh, meaning that all the nooks and crannies in your object are gonna be considered when it's calculation collisions, which is great for something like a shooter, where you'll have lots of bulletholes peppering your objects, but if you just want to make a scene that people walk around in, a simple cube will suffice.

LOD- Level of detail models this was very cool but I’ll have to study it a bit more. I’ve noticed this in games and it’s cool. The farther you get away from an object the less details it shows, but not only because it is farther away, but because you should not make the engine display details that you can’t see, thst is not efficient and you want to reduce overhead. So the engine automatically loads, less resolution duplicate models with less polys to reduce the rendering work load.

Yup. LODs are great for expansive environments. The usual standard is to have 4 different models for your LOD levels. Your full on high poly object for level 1, levels 2 and 3 being reduced accordingly, and the 4th being a billboard, or a simple plane with a picture of your tree on it.

When building an actor/object, being aware of the number of polys you are creating.

Yup. For game engines, you want to go as low as possible while still maintaining your looks and style. That in and of itself is something of an art.

Also, I'm not 100% sure what a master material is. That sounds like something UE specific.
 
Last edited:
Actually, I don’t feel that I am that artistic either despite having a BFA in Commercial Art and never working in the field.
The problem isn't that you're not artistic, it's that you haven't spent enough time goofing around, and cribbing from other people's work to say that you are.

The problem is interest. It's not that I can't create something in Blender. It's that I'm not interested. Or not strongly interested is perhaps a better way of putting it.

My interest in that stuff is as a developer. I have no desire to build models that look like chainsaws or trees or lumber. But if you hand me those assets, I can make your character cut down the tree. Those are the problems I enjoy solving. I have no desire to build a 3D model of a barrel, but if your inventory items keep ending up attached to the barrel instead of the player, I'm your guy.

That said, I did walk through one of those "build a pretty world" tutorials. Not because I have a strong desire to do more of that. But just because I was curious about how it was done. It was interesting, but not something I would normally enjoy doing with my spare time.
Eventually my goal is to make a VR hidden grotto with a waterfall. Or a fancy tree house overlooking some fantastic scene. :D
 
This was a super early experiment, I only have some static shots, I'll have to dig those up - it's Unity and I wrote an interface for the Facebook API that queried your photos and built a wall you could fly through. The concept was to build all these 3D constructs, like a "City of Content" from your various social media sources, maybe use meta-data/tags for some kind of geographical-like organization.
Was there supposed to be visible images attached to this post? I can’t see them If so.
 
I'm familiar with some of the terms above. A lot of them sound specific to UE, things I haven't had to deal with before, or go by a different name from what I'm used to (which happens quite a bit, actually). Here's the way I understand them...


Lightmaps are simply the baked shadow and lighting information from your scene, usually performed on a per-object basis. Usually, this is handled by the engine itself, separate from your material stacks. Using RGB channels for a lightmap sounds like something you'd do if you're going for stylized lighting, not for a photorealistic scene.

What you're describing sounds more like channel packing to me, which is when you combine a number of images that make up a PBR material (normal, roughness, metallic, ambient occlusion, and height) into a single efficient image.

...I should watch the Intro to UE video myself to get a better idea of what you're talking about. :p


When you bake your lightmaps, the engine needs to know where to bake the light to on your object. That's where your Lightmap UV comes in, which is a 2nd UV channel on your model meant specifically to host lighting information.

Think of it kinda like layers in Photoshop, with UV 0 being your base color of your object, and UV 1, your lightmap, or the light colors, shadows, and whatnot painted on top of your base color.

And if you don't know what UVs are, well, that's a conversation in and of itself.


What they probably mean here is that you need to have one material per object for maximum efficiency. Like, for example, if you have some object that's a mix of wood and metal, like a pistol, you'd be tempted to assign a metal material to the metal bits of your pistol, and a wood material to the grip. That would work, but it'd be inefficient, especially when you start stacking tons of objects in your scenes. It's better to have both the metal and the wood in the same material.


I think of overdraw as applying more to densely packed alpha mapped objects, like grass, tree leaves, particle effects, and whatnot. The engine has to calculate the alphas on each of these textures, what's in front of what, what's behind what, what can be seen through, what can't, and when they're all bunched together in a far more dense than it needs to be pile, the engine has to spend that much more time on it, hurting performance.


I could've told you that. :p

By the way, anything that can be done in Max, can also be done in Maya, or Blender, or Cinema4D, or what have you. They're all just polygon editors, doing basically the same things.


Yeah, more often than not, you can let UE just make a collision mesh for you. Though if you want to maximize efficiency, you can make your own collision meshes in your favorite DCC.

Think of something like, say, a gas pump. If UE generates the collision mesh, it'll be based off the original mesh, meaning that all the nooks and crannies in your object are gonna be considered when it's calculation collisions, which is great for something like a shooter, where you'll have lots of bulletholes peppering your objects, but if you just want to make a scene that people walk around in, a simple cube will suffice.


Yup. LODs are great for expansive environments. The usual standard is to have 4 different models for your LOD levels. Your full on high poly object for level 1, levels 2 and 3 being reduced accordingly, and the 4th being a billboard, or a simple plane with a picture of your tree on it.


Yup. For game engines, you want to go as low as possible while still maintaining your looks and style. That in and of itself is something of an art.

Also, I'm not 100% sure what a master material is. That sounds like something UE specific.
Master material from what I could tell has different textures in each channel like leaves in one channel, twigs in another channel, some color which was used to make the forest floor and I think its qualities can be altered, which may also be a “material instance”. I maybe confused some of this with the channels, as a light map or a master texture. The Forest tutorial guy addresses it briefly when he is talking about the Forest floor texture.

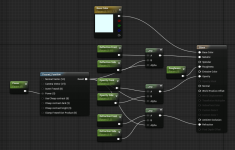
When you open one of these things (materials, material instances?) in the editor you get something thst looks like this, a series of logic gates:

1DFE0485-1A3C-43A2-8F49-9F9B515CAC5F.png

 
When you open one of these things (materials, material instances?) in the editor you get something thst looks like this, a series of logic gates:

The way I understand instances is that they're clones of a parent object, and the advantage of them is that they take up no more memory beyond what the initial object uses. You can scale, rotate, and translate them independently of the parent object, but you can't edit them directly. You can only edit the parent object, and when you do, whatever changes you've made are instantly updated on all the instances in your scene.

Like, say you're making a forest, and you have this one tree you want to use again, and again, and again. You make mutliple instances of this one tree, scatter them about, rotate them, scale them up and down for variety, and you'll have a nice, memory efficient forest. But if you suddenly decide that you don't like the way one branch is hanging off your trees, you can go back to the parent object, remove that branch, and suddenly none of the trees in your forest have that branch.

That's kind of the way he's describing these master textures and texture instances, but there must be something different about them, because all materials are instanced by default. If you have two or more objects sharing the same material, any change you make to one will be reflected in the other, unless you make them individual.

I'm missing something here, so I guess I'll watch the next part to see what more he says.

Also, that node tree you linked to above is a glass shader. It's using a fresnel effect, which is how the reflectivity of an object changes depending on the angle you're viewing it at. Like you see a puddle of water in the road. From a distance, it looks like it's reflecting the sky, but as you walk closer to it, it gets more and more transparent. When you're standing over it, there's almost no reflection.

Lerping is when you have parts of a material transitioning from one attribute to another based upon a set of variable, which in this case would be whether the camera is viewing the texture from the front, or from the side. In short, it's lerping back and forth between two reflectivity, opacity, and refractivity parameters depending upon your position relative to the glass material.
 
Okay, I think I got it.

In Unreal, you can have a master material, which would be something basic, like grey metal. You can make an instance of that grey metal, change some parameters to make it rougher or smoother, blue or green, or any other type of things you defined as a perimeter in the master material. In other words, you're making variations upon the same base.

I think it does this without using more memory than the source master texture resides in, hence calling them instances. That's pretty neat.
I find it neat because this appears to a a bit of programming a mini-program imbedded into UE that does something for the user with zero programming skills like… the entire engine. ;) But you can do things in C++, but that is way beyond me for now.

I started to do the Blender Complete Beginner’s Tutorial you linked and something inside me rebelled. i saw the little scene the guy was going to have me make and I was like, NO, don’t need this right now, got enough on my plate. ;) Not that it’s a bad tutorial, so I started looking for Blender, working with grid videos and found a couple although I don’t know how in depth they are and I’ll start looking at your 2 recent posts that discuss Blender tools/commands for this grid I want to make and that Blender Top 5 Tool video. Hopefully this will be enough to get me through that grid part of the Forest scene before importing to UE.

Then since the guy talks about his UE Master Material, I’ll be looking at some tutorials on those too.

Step one is to get the grid done. Btw I asked a question about the grid over at forums unreal engine.com and someone there said there was a plug-in for UE that lets you make grids. Since I watched it done in Maya though, I’ll try to be a copy cat in Blender, and learn more about that later for UE.
 
Since I watched it done in Maya though, I’ll try to be a copy cat in Blender, and learn more about that later for UE.

I'll make you a video tomorrow. Because I don't have a mic, I'll have go through all the steps fairly slowly so you can follow along.

And no, it's not a problem. It shouldn't take me more than 5-10 minutes. :D
 
Dude, you're killing me! We used to have conversations! We used to be FRIENDS!

But anyway, HORRIBLE SLIGHT aside, if you want to hit the ground running as soon as possible, I'd watch this quick 7 minute video showing off the tools you'll be most using while modelling. I'd replace Grid Fill with the Inset tool, but, eh, it's still pretty good.


But if you want to get a little more indepth with the basics, Grant Abbitt's series is solid for that.


Okay, I just realized I misread your quote.

Yes, I'm Renzatic over at Blenderartists too.

I watched part of the 5 Tools video and that was good, will finish it up tomorrow. The only thing is and I've seen this before, these guys don't tell you all of their settings, so I freeze the video, then look at their interface to make sure I'm matching them. :)

Now this other video I watched had no talking just labels thrown up on the screen and the person made a sphere. I learned how to rotate it holding the MMB and using the keypad numbers, that's good, but then he oriented it at the top facing you with the NP7 key, then selected the vertex in the center of the sphere (top) and from this orientation the concentric circles with vertices, I would call them latitudes, after selecting the top single vertex he flashed on the screen a way to select the top 3 latitudes with these key commands which don't make any sense to me: Ctrl+ NP+x3 as in Ctrl Key + Number Pad (number pad what?) and x3 (what ever that means unless you meant hold Ctrl +NP3, which did not work, that just rotated the sphere as I recall. He also said by " " that Ctrl+ NP + x5 would select the top 5 vertices, and then delta would erase them and the top of the sphere. Any ideas what keys this person was talking about? Note, if I manually selected the 5 top latititudes of the sphere, I could indeed erase them with Delete.
Thanks!

If he's using the keypad numbers, then he's not rotating the sphere, he's orienting the view to the top of the sphere. If you don't want to use the numpad to rotate your view, you also hit the Tilde key to bring up a pie menu showing your orientation selections (which is what I do).

And he's hitting Ctrl+ Numpad Plus key, 3 times. That grows the selection out from your initially selected element. You can shrink it with Ctrl + Numpad Minus.
 
Back
Top